This is my column from the August 2015 issue of Two-Lane Livin’ WV’s Largest Grassroots Magazine!
The Headboard Bench
The heat of summer is upon us. After a long hot day, finding a comfy spot in the shade is a great evening treat. It is even better if you made the seat yourself.
Benches made from old head and foot boards are in fashion right now. They are not difficult to make, but they do take a bit of time and planning.
Materials
An old headboard or foot board is needed for the basic frame of the bench. You also need lumber to complete the frame and provide support for the seat. Wood screws are preferred over nails, but nails are fine. A piece of plywood for the seat, and paint will complete the project.
Basic Process
Stripping the paint is optional for your bench, it a matter of preference. The headboard and footboard I used had many layers of paint. The topmost layer was a shade of blue somewhere between navy and periwinkle. Underneath was a dark brown covering the original dark stain popular in furniture back in the 1980’s.
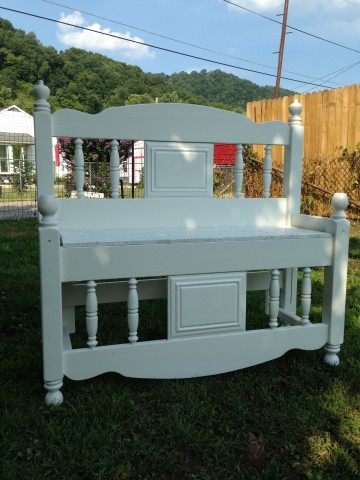
I opted to strip the wood as much as possible. This took a lot of time because of the spindles, and knobs. The finished white bench is a testament to the effort invested.
The width of the headboard will set the width of the bench. You will need to decide the depth of the seat. I measured a porch swing seat for size. Then cut the plywood to fit.
For this particular bench I turned the footboard upside down. This was due to the shape. With the footboard is in the normal position there is a hump that would hurt the legs. The only other way to address that problem is to cut off the bottoms of the posts. This creates another challenge of the seat being positioned above the footboard, destroying the look.
With the footboard upside down, I only needed to remove a small portion of the top spindle and smooth the ball by sanding. A little filler in the new top spindle hides the fact it was previously the bottom.
Screwing boards on the back of the footboard and front of the headboard provides the support for the plywood seat. Cut the lumber to the desired size and build the bench sides. Two boards on each side, one at the seat and one at the feet, create stability and additional support.
Painting the bench is a matter of choice. My bench is exposed to the elements, on an uncovered porch, so I wanted a paint made for the outdoors. Adding a cushion gives a bit more flare and comfort.
Head and footboards can be found at yard sales, flea markets, and used furniture stores. In true upcycle fashion mine came from the trash, discarded by someone moving out of a rental unit.
XXX
By Robin Holstein
Robin’s Upcycle is located in Kanawha County, WV. Open by appointment.
Phone 304-460-5NEW (5639).
For info, visit facebook.com/robinsupcycle


